
robotics-university.com | Hello friends, before you build an Internet of Things (IoT) project using ESP32 board and Arduino IDE, it is better if you read this article first in order you will know how to install ESP32 board in Arduino IDE. It is important to understand this thing, because you can’t design your IoT applications using ESP32 board and Arduino IDE, if ESP32 board is not installed in Arduino IDE. So, keep read this article!
1. Prerequisites
To install ESP32 board in Arduino IDE, you need to prepare the items below:
A. Arduino IDE on your computer
Before starting this installation procedure, make sure you have installed the latest version of the Arduino IDE in your computer.
If haven’t installed it, get the Arduino IDE installer file from the Arduino official website, click here! www.arduino.cc/en/Main/Software
B. Git software
Download and install Git software. To get the Git software, you can download it by click this link here!
C. ESP32 Board
To test the installation of ESP32 board in Arduino IDE directly after the installation process complete, you need ESP32 board connect to your computer via USB port.
2. Steps to ESP32 Board Installation in Arduino IDE
For your information, this guidance is tested on computer with Windows operating system.
Step 1: Finding your Arduino IDE location (Installation Directory/Path)
A. Open Arduino IDE
First, run Arduino IDE!

Figure 1. Arduino IDE opening
B. Open Preferences window
Then open “Preferences” windows by select “File” menu then select “Preferences” option. See figure 2.

Figure 2. Step to open Arduino IDE’s preferences windows

Figure 3. Arduino IDE’s preferences windows
C. Copy the Arduino IDE Location (Installation path)
Next, copy the Arduino IDE Location (Installation path) and paste on Notepad.

Figure 4. Copy the Arduino IDE Location (Installation path)
In my case, it’s the following:
C:\Users\taufi\Documents\Arduino
Then edit the “Sketchbook location” with forward slashes, so it looks as follows:
C:/Users/taufi/Documents/Arduino
That’s call with the “Arduino_IDE_Installation_Path.” Save it, because you’ll need it in just a moment. After that, close the Arduino IDE.
Step 2: Open Git software to clone the Arduino-esp32 repository
If you have installed Git software on your computer, then run the Git GUI.
A. Run Git GUI software as administrator
Open “Start” button, find the “Git GUI” icon, then right-click and select “Run as Administrator.” See figure 5.

Figure 5. Run Git GUI software as administrator
B. Select the “Clone Existing Repository” option

Figure 6. The Clone Existing Repository option
Then, follow these instructions to enter the Source Location and Target Directory.
For the source location, fill with Espressif Github (Git) repository URL, i.e.
https://github.com/espressif/arduino-esp32 (Valid access on June 28th 2020)
For the Target Directory, type your Arduino IDE installation path manually, i.e.
Arduino_IDE_Installation_Path/hardware/espressif/esp32
In my case, it looks like this:
C:/Users/taufi/Documents/Arduino/hardware/espressif/esp32
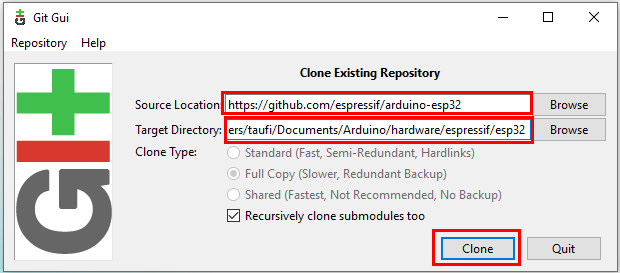
Figure 7. Enter the Source Location and Target Directory
Important:
Before you press “Clone” button, make sure that your computer connects to the internet network. Because this step need internet connection to access and to clone files in the “arduino-esp32” repository that place on Github.
Then press the “Clone” button (See figure 7). Wait a few seconds while the repository is being cloned. See figure 8.

Figure 8. The repository is being cloned

Figure 9. The repository has been cloned (Ready)
If the repository has been cloned/Ready (See figure 9), then open the folder below:
C:\Users\taufi\Documents\Arduino\hardware\espressif\esp32\tools
See figure 10! In the “tools” folder, right-click the “get.exe” file and Run it as administrator.

Figure 10. “tools” folder and “get.exe” file
Wait until the download process finish and all of the files that we need prepared (extracted) in the “tools” folder. See figure 11.

Figure 11. All of the files has been prepared (extracted) in the “tools” folder
If all of the files that needs has been download and extracting (See figure 11), the next step is re-open the Arduino IDE software.
3. Test the ESP32 Board Installation in Arduino IDE
To test the ESP32 board installation in Arduino IDE, plug the ESP32 board to your computer via USB port. With your Arduino IDE open, follow these steps:
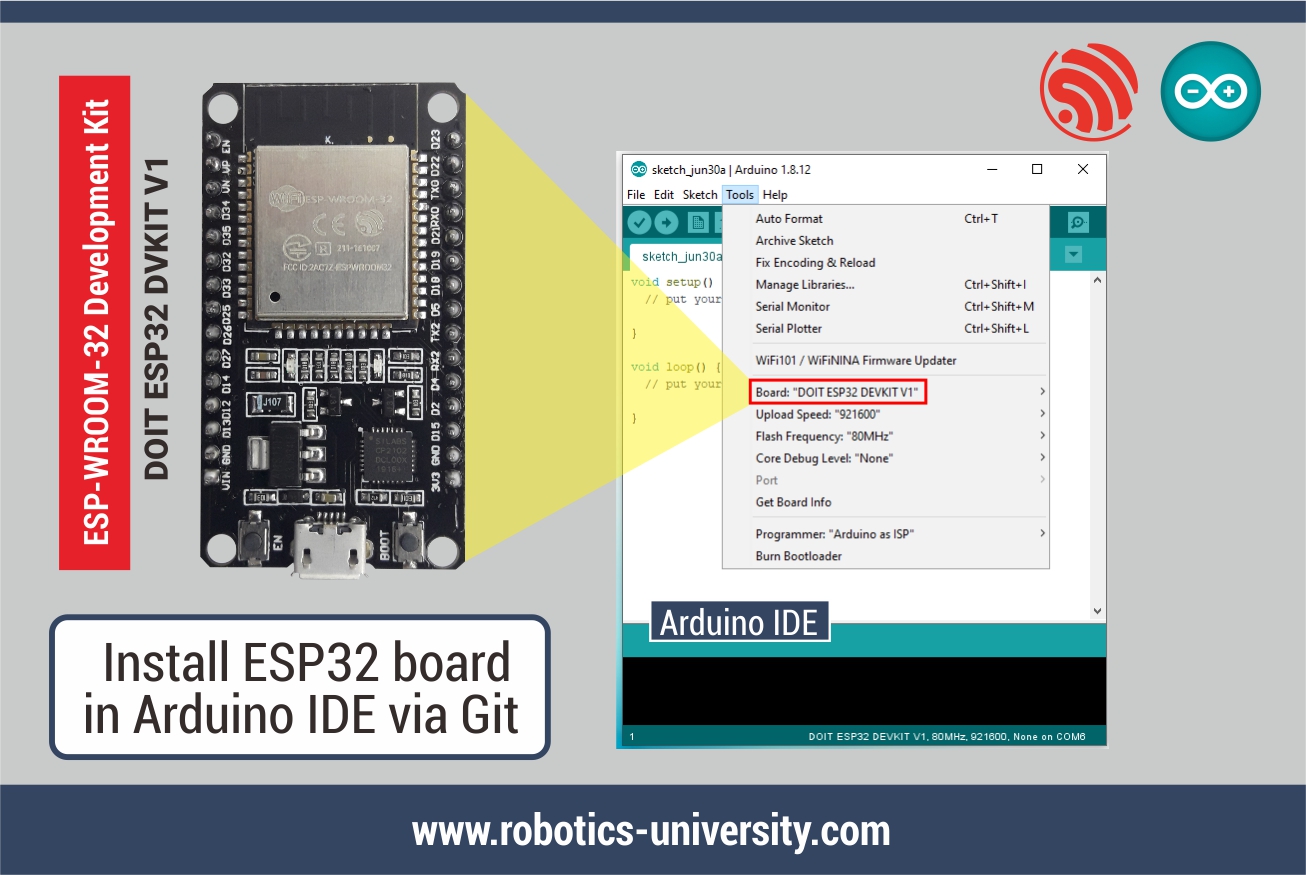
Step 1: Select ESP32 Board (DOIT ESP32 DEVKIT V1)
To select an ESP32 board that will you use, select “Tools” menu on the menu bar, then select “Board” option, then select one of the ESP32 board name that suit with yours. See figure 12.

Figure 12. Select ESP32 Board (DOIT ESP32 DEVKIT V1)
Step 2: Select the ESP32 Board COM Port
Select the COM port (See figure 13). If you don’t see the COM Port in your Arduino IDE, you need to install the CP210x USB to UART Bridge VCP Drivers. Click here to download! and then install it on your computer.

Figure 13. ESP32 Board COM port selecting
Step 3: Open the available example File
To test your ESP32 board, you can use an available example file. Open the following example under File > Examples > WiFi (ESP32) > WiFiScan

Figure 14. Open ESP32 application example (WiFi scan)

Figure 15. “WiFiScan” sketch (program) has opened
Step 4: Verify (Compile) and upload the sketch
In order you can sent the sketch to the ESP32 board microcontroller, Verify the “WiFiScan” sketch, then after it has done, press the Upload button in the Arduino IDE to upload your program to the ESP32 board.

Figure 16. WiFiScan sketch uploading has completed
Wait for a moment when the code compiles and uploads to your ESP32 board. If everything run as expected, you will see a “Done uploading” message. See figure 16.
Note
Problem:
If you get this error message: “A fatal error occurred: Failed to connect to ESP32: Timed out … Connecting …“ when you want to upload a new program/sketch to your ESP32 board, It means that your ESP32 board is not in flashing/uploading mode.
Solution:
Make sure, you have selected the right board name (DOIT ESP32 DVKIT V1) and COM port that connect to your ESP32 board, then follow these steps below!
1. Press and hold-down the “BOOT” button in your ESP32 board with your finger.
2. Upload your sketch again with press the “Upload” button in the Arduino IDE.
3. If you have seen the “Done uploading” message in your Arduino IDE, release your finger from the “BOOT” button.
4. Now, your ESP32 board have the new sketch running. Press the “ENABLE” button to restart the ESP32 board and run the new uploaded program.

Step 5: Open the Arduino IDE’s Serial monitor
In order you can see the WiFi networks that available near your ESP32 board, open the Arduino IDE’s Serial Monitor. See figure 17 and figure 18 to know the steps and the Serial Monitor windows.

Figure 17. Arduino IDE’s Serial monitor opening step

Figure 18. Arduino IDE’s Serial monitor has opened
Step 6: See the WiFi network that available on Arduino IDE Serial monitor
In order you can see the scan result of WiFi networks near your ESP board, set the serial communication baud rate on the Arduino IDE Serial Monitor equal to 115200 baud (See figure 19).

Figure 19. Drop-down to select a serial communication baud rate (115200 baud)
Then press the ESP32 on-board Enable button and you should see the networks available near your ESP32 (See figure 20).

Figure 20. Available WiFi networks displayed on Serial monitor
If your ESP32 board can detected WiFi networks around, it’s means that your ESP32 board work well and in good condition. So, you can build another Internet of Things (IoT) project using it. In the same time, it’s means that yourESP32 board has installed in Arduino IDE properly.
Source
0 comments:
Post a Comment