

robotics-university.com | Hello my friends, on this article I wanna inform you if you build a LabVIEW application project and your project need an interfacing between LabVIEW with a hardware, so before you can do that interfacing, you need to install National Instrument (NI) VISA software on your computer first. VISA stand for Virtual Instrument Software Architecture.
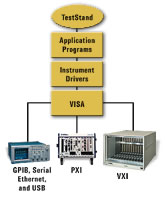
Figure 1. NI-VISA become the bridge for hardware and software interfacing
(Source: https://www.ni.com/visa/)
I got this information from National Instrument official website that talk about NI-VISA. Here is the link: https://www.ni.com/visa/
They write on that page:
“The Virtual Instrument Software Architecture (VISA) is a standard for configuring, programming, and troubleshooting instrumentation systems comprising GPIB, VXI, PXI, Serial, Ethernet, and/or USB interfaces. VISA provides the programming interface between the hardware and development environments such as LabVIEW, LabWindows/CVI, and Measurement Studio for Microsoft Visual Studio.
NI-VISA is the National Instruments implementation of the VISA I/O standard. NI-VISA includes software libraries, interactive utilities such as NI I/O Trace and the VISA Interactive Control, and configuration programs through Measurement & Automation Explorer for all your development needs. NI-VISA is standard across the National Instruments product line. With NI-VISA, you can feel confident that your software development will not become obsolete as your instrumentation interface hardware needs evolve into the future.”
Because of that information, its better before use LabVIEW to interface with a hardware devices, we install NI-VISA software first. In order our application project that using LabVIEW and our hardware devices can run well as our expectation.
Download & Install NI-VISA
Step 1: Download NI Package Manager Installer
To download NI Package Manager Installer, please visit this link below!

Figure 2. NI Package Manager download page

Figure 3. NI Package Manager Installer
Your downloaded software is delivered using NI Package Manager. NI Package Manager is your access hub to download, install, upgrade, and manage all NI software. Note that this utility is different from VI Package Manager.
Step 2: Install NI Package Manager
To start installing NI Package Manager, launch the “ni-visa_19.0_online.exe” file, then the installation process will starting. See figure 4 and figure 5!

Figure 4. NI software license agreement

Figure 5. NI Package Manager installation process running
Step 3: Download & Install NI-VISA via NI Package Manager
After we launch the NI Package Manager installer file and NI Package Manager installation process complete, so the NI-VISA software installation process will start automatically. One of the installation page contain the NI software list will appear. See figure 6 and figure 7!

Figure 6. NI software list (1)

Figure 7. NI software list (2)
NI software on that list above are software which will give support when NI software (include LabVIEW) use to interface with specific hardware.

Figure 8. Reboot the computer after NI-VISA installation complete
Step 4: Try To Interface LabVIEW with a Hardware
If all of the steps above has done, now, please try to interface your hardware with LabVIEW (or another NI software).
0 comments:
Post a Comment