

robotics-university.com | After on the previous article about “IDE Arduino software” and “Introduce To IDE Arduino Work Area,” then this article will ask all off you to know how to use IDE Arduino software to build an automation project. Start from make the program (Sketch), then compile the program, and further send compiled program (upload) to the processor chip (microcontroller) that embedded on the Arduino board. For your information, this tutorial run on computer with Windows7 operating systems.
Step 1: Run the IDE Arduino
To run the IDE Arduino, double click IDE Arduino shortcut icon (See figure 1) on your computer desktop, or you can open it from Windows program menu with follow step, press “START/WINDOWS” button, choose “All Program,” then found IDE Arduino icon on the menu list, and click it one time (See figure 2).

Figure 1. IDE Arduino shortcut icon

Figure 2. Push START >> All Program >> Arduino
After the steps above done, then opening display of IDE Arduino will appear, as shown on figure 3 below.
Figure 3. Opening display of IDE Arduino
Just a moment, then IDE Arduino work area will open as shown on figure 4.

Figure 4. IDE Arduino work area
Step 2: Typing the Program (Sketch)
After IDE Arduino work are opened, then we have ready to start our next job, i.e. typing our automation project program (Sketch). On this first Arduino project, I will ask you to make a project to the light-control (ON/OFF) of a LED (light Emitting Diode) component that connected on Arduino Uno board digital pin number three alternately. So deliver blinking LED light effect with time delay as long as 500 millisecond (mS).
To simulate this project, I use Proteus simulator software help. Figure 5 is Arduino Uno project electronics schematic to control the ON or the OFF of a LED component that connected on its digital pin number 3.

Figure 5. Arduino Uno circuits with a LED on digital pin number 3
(Note: Arduino Uno library for Proteus from www.theengineeringprojects.com)
If the hardware of our Arduino Uno project has ready, let typing the program for our project, so our first Arduino Uno project successfully built. Type the program below:
// Program membuat nyala LED berkedip-kedip (ON/OFF)
#define LED 3
void setup()
{
pinMode(LED, OUTPUT);
}
void loop()
{
digitalWrite(LED, HIGH); // LED nyala
delay(500); // Tunda 500 mS = 1/2 detik
digitalWrite(LED, LOW); // LED padam
delay(500); // Tunda 500 mS = 1/2 detik
}
Type the program above on the IDE Arduino text/program editor.
Step 3: Save the Program
If the program has already typed, then in order to we aren’t lost the program file, don’t forget to save it into your computer hardisk. The method to save the program file can be done with 3-ways. The first method, press Save button icon on the IDE Arduino tool-bar, as shown on the figure 6 below.

Figure 6. Save button icon on the IDE Arduino tool-bar
The second method, choose File menu on the IDE Arduino menu-bar, then move-down the cursor and choose “Save (Ctrl+S)” option. See figure 7.

Figure 7. Save program file method, File >> Save
And the third method, save program file using computer keyboard button shortcut, i.e. a combination between control (Ctrl) button and S letter button (Ctrl + S). From the three method to save program file, just choose one method.
After we do one of the step above, then “Save sketch folder as….” Window will opened. See figure 8. Choose a computer directory as our program file storage.

Figure 8. “Save sketch folder as…” window
Type the name of our program file and don’t forget to make sure that our program file using “.ino” extension. Then press Save button.

Figure 9. The storage directory (folder) of Arduino program file
After Save button pressed, then in the storage directory that we choose to save our program file will generate a storage folder automatically. The folder name is same with the program file name. See figure 8 and figure 9.
With standalone folder generation for program file, it will separate our program file from other files or programs in the directory that we have chosen (See figure 8). So this condition facilitate us when will find the other Arduino projects program file in the next time, because the program files are not mixed.
Step 4: Compile the Program (Compile/Verify)
After program file is saved, the next step is translate or compile (Verify) the ino program file, in order it be ready to send (Upload) to the microcontroller chip that embedded on the Arduino board. There is three method to compile a program. The first, with press Verify button on the IDE Arduino tool-bar. See figure 10.
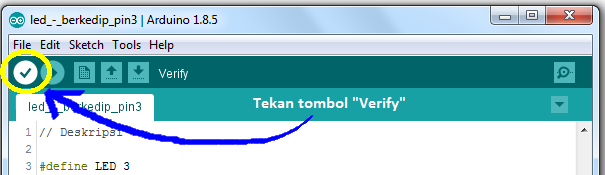
Figure 10. Verify button on IDE Arduino
The second, choose Sketch menu on the IDE Arduino menu-bar, then move down the cursor and choose “Verify/Compile (Ctrl+R)” option.

Figure 11. Cara menerjemahkan/kompilasi program, Sketch >> Verify/Compile
And the third, with using computer keyboard button shortcut, i.e. combination between control (Ctrl) button and R letter button (Ctrl + R). From the three program compile method above, just choose one method.

Figure 12. Program compilation process still running
After one of the three compile method above done, then program compilation process will run. See figure 12.

Figure 13. Program compilation process has done
If compilation process has done, then there “Done compiling” notification will appear, it signed that the program compilation process has finished. See figure 13.
Step 5: Program Uploading to Arduino Board
After program making and compiling steps has done, then last step that need to do in order our project purpose that we make on our first project using IDE Arduino can see the result is send or upload the program into a microcontroller chip that embedded on the Arduino board. Below is the steps that need to do:
A. Connect the Arduino Board to the Computer
The first is connect or install the Arduino board (I use Arduino Uno board) to the computer that we use, as shown on the figure 14.

Figure 14. Arduino Uno board connected to the computer
B. COM Port Number Check of Arduino Board on the Computer
Before Upload the program, we need to know in where computer COM port our Arduino board connected. We have to know the computer COM port number that used. We can check the COM port number on the computer Device Manager, as shown on figure 15.

Figure 15. Device Manager window - Arduino Uno on COM port number 14 (COM14)
This step need to do, because on the program “Upload” process using IDE Arduino there is a step to choose computer COM port that use for communication/interface line between Arduino board with computer that we use.
C. Choose Arduino Board That Used
Next step is choose Arduino board that we using. On this tutorial, I use Arduino Uno board. So on Arduino board type selection step must be choose “Arduino Uno.” The steps is press tab-tool on the IDE Arduino Tool-bar, then move-down the cursor and click “Board: …,” Shift the cursor to right, then choose “Arduino/Genuino Uno.” See figure 16.

Figure 16. Arduino board selection
D. Choosing Computer COM Port Connection That Used
After choose the Arduino board that connected on the computer that we use, next step is choose the computer COM port that we use for communication line between Arduino board and computer. As we have seen on the computer “Device Manager” (See step B above), an Arduino Uno board connected with computer COM port number 14 (COM14), then we choose COM14 as communication line for Arduino Uno board with computer. See figure 17.

Figure 17. Arduino Uno board connected on COM14
E. Make Sure, the Arduino Board and the Computer Connection Has Corrected
The last step before uploading the program to the Arduino board microcontroller chip is make sure the Arduino board and computer connection has corrected. This step can do with see the notification check on the right-bottom part of IDE Arduino. See figure 18. The information from the notification give information that Arduino/Genuino Uno board has connected to the computer correctly via computer COM port number 14 (COM14).

Figure 18. Board Arduino Uno has connected via computer COM14 correctly notification
F. Uploading Program to Arduino Board
There is three program uploading method. The first, with press the Upload button icon on the IDE Arduino tool-bar as shown on the figure 19.

Figure 19. Upload button icon on IDE Arduino
The second method, choose Sketch menu on the IDE Arduino, then move-down the cursor and choose “Upload (Ctrl + U)” option. See figure 20.

Figure 20. Program uploading method: Sketch >> Upload
The third method, with using computer keyboard button shortcut, i.e. combination between control (Ctrl) button and U letter button (Ctrl + U). From the three file program uploading method, just choose one method.

Figure 21. Program upload process is running
After one of the three uploading step done, then the program upload process will run. See figure 21.

Figure 22. Program upload process is done
If the program upload process has done, the will appear notification “Done uploading,” that sign the program uploading process has done. See figure 22.
G. Observe the Working Result
If the program uploading process has done successfully, next observe our working result in embedded systems project building using Arduino board. Watch the system behavior that we has built. Has it suit with our plan or hasn’t? If it hasn’t, then do several actions that need to repair errors possibility on the hardware system or also on the software (program) system. However if it has, that mean we have successed in embedded systems building project using Arduino board. Congratulation for us!
Below is our working result video:
Thus the tutorial how to use IDE Arduino. Hopefully it is usefull.
0 comments:
Post a Comment