robotics-university.com | Hello friends, on today tutorial, I will write my learning result in Java programming. For my first learning project in build a graphic user interface (GUI) application using NetBeans IDE, I will build “Hello World” application. Let’s follow my step by step guidance below. I hope this article useful for you.
Figure 1. NetBeans IDE launcher
Firstly, open NetBeans IDE by click Windows “Start” button and then click “NetBeans IDE” launcher. See figure 1. The NetBeans IDE will open after you click launcher and show an opening display as shown on figure 2 below.
Figure 2. NetBeans IDE opening
Figure 3. NetBeans IDE start page
Figure 3 show to us the NetBeans IDE start page. If you want to start mak new GUI project using NetBeans IDE, click “File” menu on NetBeans IDE menu-bar and select “New Project” option or you can use shortcut-key Ctrl + Shift + N. See figure 4.
Figure 4. Step to make a new GUI project on NetBeans IDE
After that “New Project” window will open. On the New Project window, select project category. Choose “Java” on project category field and for project type, choose “Java Application” on project type field, then click “Next” button (See figure 5).
Figure 5. New Project window of NetBeans IDE
After you click Next button, a “New Java Application” window will opened. See figure 6!
Figure 6. New Java Application window
On the New Java Application window, determine the project name and browse the project location (directory). Don’t forget to uncheck “Create Main Class” option and the click “Finish” button. See figure 6 above!
Figure 7. Create new Java application form
After you click finish button, on the NetBeans IDE project explorer will available the new project name that has created by you on the previous step. For the next step is you have to create a new java application form. Right-click the project name on th project explorer, then select “New,” shift your cursor-mouse to right , and select “JFrame Form” option. See figure 7.
Figure 8. New Jframe Form window
A New Jframe Form widow will open as show on figure 8. On New Jframe Form, determine “Class Name” and determine the “Package” for the project, then click “Finish” button.
Figure 9. Java Application work environment - GUI design area
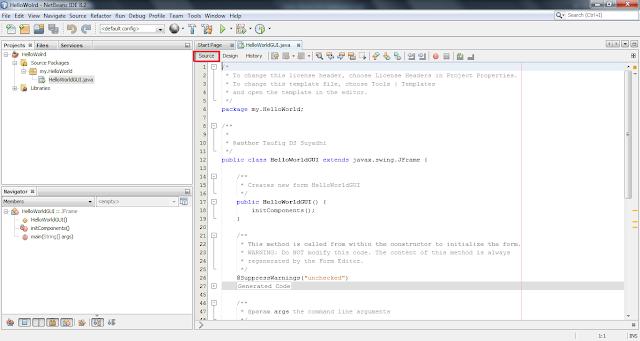
Figure 10. Java Application work environment - GUI source code area
After that, Java Application work environment will open as shown on figure 9 and figure 10. Figure 9 show the GUI design area, while figure 10 show GUI source code area. On the GUI design area, you can create your GUI application project with follow your GUI project specifications and control your GUI behaviour with Java programming on the GUI source code area.
Hello World Application - Example
As example, we will create a simple GUI, i.e. a GUI that contain with a Swing “Button” object. If the button clicked, so a “Hello World!” message window will appear.
Step 1: Place an Object on JFrame Form
Figure 11. Add “Button” object to Java Application Form area
To start add “Button” object to java application form area, left-click the button object on the Swing Containers palette, then lay your mouse-cursor to the top of JFrame Form area (See figure 11). If you have been determine a proper place on JFrame Form that you want, left-click again to place the “Button” object on the JFrame Form (See figure 12).
Figure 12. “Button” object has been placed on the JFRam Form
Step 2: Edit the Object Name
After the button object placed on the JFrame Form, you can edit the button properties that you need to be edited. For example you want to edit the button name. At the first, click the button object, click “Properties” button, edit the “button” name on the “Text” field with “Hello World!,” and then press Enter key. See figure 13 and figure 14.
Figure 13. Button object properties
Figure 14. Change button name with “Hello World!”
Step 3: Edit the Object Variable Name
If you want to edit the variable name, click the button object, click “Code” button on the object properties area, and edit variable name on the variable name field from “JButton1” become “btnHelloWorld” (See figure 15 and figure 16).
Figure 15. Variable name field
Figure 16. Edited variable name (btnHelloWorld)
Step 4: Select an Event
To change button object event, click the object button, click “Events” button on the properties area, and select an object event that you want. On this example we want if the button object clicked, so a “Hello World!” message window will apear. For this purpose we choose “ActionPerformed” object event. See figure 17.
Figure 17. Select “ActionPerformed” object event
Step 5: Open GUI Source Code Area
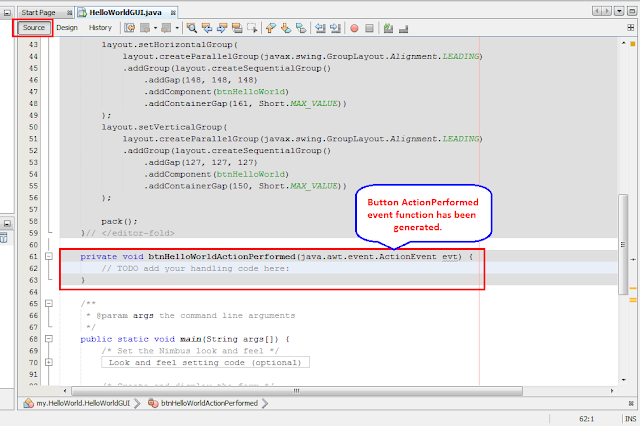
In order we can control the “Button” object behaviour, we have to create Java program on the GUI source code area. To start create the Java program, we must open the GUI source code area. Click “btnHelloWorldActionPerformed” on the ActionPerformed event drop-down. See figure 18.
“btnHelloWorldActionPerformed” consists of “btnHelloWorld” variable name and “ActionPerformed” event, on the GUI source code area, it will become a function (program block) name to control “Button” object behaviour. See figure 19.
Figure 18. ActionPerformed event drop-down
Figure 19. “btnHelloWorldActionPerformed” function (program block)
Step 6: Type the Java Program
If the GUI source code area has been opened, to control the “Hello World!” button we have to type Java program on the “btnHelloWorldActionPerformed” block program (function). To make the “Button” object can open “Hello World!” message window (Dialog) when clicked, so type the program below (See figure 20):
JoptionPane.showMessageDialog(null, “Hello World!”);
After you have been finished type the program, dont’ forget to save this project.
Step 7: Run the Hello World Java Application
If the “Hello World” GUI and its Java program has been create completely, the next step is test running this application project.
Figure 21. “Run project” button
To start running the application project, press the “Run Project” button on the NetBeans IDE task-bar or you can use shortcut keyword F6. See figure 21!
Figure 22. “Hello World!” button
If there is no errors on the GUI application and its Java program that has been created, after “Run Project” button clicked, “Hello World!” message window (dialog) will appear as shown on figure 23.
Figure 23. “Hello World!” message window (Dialog)
Congratulation, your first GUI Java application project has been created successfully!


0 comments:
Post a Comment