

robotics-university.com | Hello friends, today I invite you to learn about one of popular 32-bit microcontroller chip with ARM Cortex-M0 architecture. This microcontroller chip produced by Nuvoton. On this article, I will make a guidance to get started NUC120 chip programming using Coocox CoIDE. Why Coocox CoIDE? Because Coocox CoIDE is free to use and has complete feature as an IDE software.
On this project, I use NUC120 series microcontroller chip that was embeded on DT-ARM NUC120 board (See figure 1). As you know from my previous article, DT-ARM NUC120 board has been equipped with NuLINK programmer. Okey ... let’s continue read this article and practiced by follow the guidance on this project, in order you can build your own STM32 project at home.
1. Project Materials
To build this project, we have to has the project materials. Below I write-down the needs hardware and software in order you can make this project realized.
A. Hardware needs
(1) DT-ARM NUC120 board (ARM Cortex-M0).
(2) Data cable (USB type-A to Mini USB type-B).
(3) Computer/Laptop.

Figure 1. DT-ARM NUC120 board
B. Software needs
(1) Software GNU Embedded Toolchain for Arm (Compiler), GCC ARM.
- GCC ARM released 2016 - Download here!
- [Update] GCC ARM released 2019 - Download here!
(2) Software Program Editor, CooCox CoIDE. Download here!
(3) Software Pin Configuration, CooCox CoSmart. Download here!
(4) Software Program Downloader, NuMicro ISP Programming Tool. Download here!
For your information, all of the software above is free software. We can use it without time and feature limitation. If there are errors on the download link, you can download all of the software from my drive (Click here!), happy download!
2. Interface DT-ARM NUC120 Board with Computer
To start the project, at the first, you have to make your computer connect to the DT-ARM NUC120 development board via USB port. See figure 2.

Figure 2. Interfacing DT-ARM NUC120 board with computer
3. The Installation of The Needed Software
3.1 Install The GNU Embedded Toolchain for Arm (GCC ARM)
From ARM developer official website (www.developer.arm.com), we know what is GNU Embedded Toolchain for Arm? Here is the complete description:
“The GNU Embedded Toolchain for Arm is a ready-to-use, open source suite of tools for C, C++, and Assembly programming targeting Arm Cortex-M and Cortex-R family of processors. It includes the GNU Compiler (GCC) and is available free of charge directly from Arm for embedded software development on Windows, Linux, and Mac OS X operating systems.”
To getting started install GCC ARM, just double-click the installer file (exe) that you have been downloaded from ARM developer website. See figure 3!

Figure 3. GCC ARM installer file
Important:
The important thing when we install the GNU ARM is we have to memorized the GNU ARM installation path (directory). Because the GNU ARM installation directory will become directory for Coocox CoIDE (on sub directory bin) and Coocox CoSmart (on the store folder of arm-none-eabi-gcc.exe file) installation.

Figure 4. GCC ARM installation path (directory)
On my computer, the GCC ARM installaed on C:\Program Files (x86)\GNU Tools Arm Embedded directory. I use 64-bit Windows 7 operating systems on my computer.
3.2 Install Coocox CoIDE
After you have been finished install the GCC ARM, next install Coocox CoIDE. Coocox CoIDE is a software where we can create C/C++ program to configure STM8 or STM32 processor utilities. To getting started install Coocox CoIDE, double-click the Coocox CoIDE installer file (exe) that you have been downloaded. See figure 5!

Figure 5. Coocox CoIDE installer file
Important:
If Coocox CoIDE software has been installed successfully. Run Coocox CoIDE software to select the toolchain path for GCC ARM compiler. Follow the steps below!
1. Select Project on Menu bar (See figure 6).
2. Choose “Select Toolchain Path” option (See figure 6).
3. Browse the GCC ARM installation directory. Select on the “bin” sub-directory. (See figure 7).
C:\Program Files (x86)\GNU Tools Arm Embedded\9 2019-q4-major\bin
Remember the GCC ARM installation path (directory). See figure 4!
4. Click OK. (See figure 7).

Figure 6. Coocox CoIDE - Select Toolchain Path

Figure 7. Coocox CoIDE - Browse the directory of “arm-none-eabi-gcc.exe” file
3.3 Install Coocox CoSmart
Next, install Coocox CoSmart software. Coocox CoSmart is a software from Coocox that have function when we need to configure a processor chip PIN. We can also call it with PIN Configurator software. To getting started install Coocox CoSmart, double-click the Coocox CoSmart installer file (exe) that you have been downloaded. See figure 8!

Figure 8. Coocox CoSmart.exe file
Important:
If Coocox CoSmart software has been installed successfully. Run Coocox CoSmart software to config GCC path for GCC ARM compiler. Follow the steps below!
1. Select Project on Menu bar (See figure 9).
2. Choose “Config GCC Path” option (See figure 9).
3. Browse the GCC ARM installation file directory. Open the “bin” sub-directory and select “arm-none-eabi-gcc.exe” file (See figure 10).
C:\Program Files (x86)\GNU Tools Arm Embedded\9 2019-q4-major\bin\arm-none-eabi-gcc.exe
Remember the GCC ARM installation path (directory). See figure 4!
4. Click OK. (See figure 10).

Figure 9. Coocox CoSmart - Config GCC Path

Figure 10. Coocox CoSmart - Browse the directory of “arm-none-eabi-gcc.exe” file
3.4 Install NuMicro ISP Programming Tool
For your information, NuMicro ISP Programming Tool (Version: 2.06) is non-installed software. To run it, we just run (double-click) the executable (NuvoISP.exe) file that store in “Application Program” folder then NuMicro ISP Programming Tool will opened.
In order we can use the NuMicro ISP Programming Tool software, follow the steps below:
- Extract the “NuMicro_ISP_Programming_Tool_V2.06” zip file (See figure 11).
- Open “NuMicro_ISP_Programming_Tool_V2.06” folder (See figure 12).
- Open “(1) Application Program” folder (See figure 13).
- Open “Executable File” folder (See figure 14).
- Double-click the “NuvoISP.exe” file to run the NuMicro ISP Programming Tool (See figure 15 and figure 16).

Figure 11. NuMicro_ISP_Programming_Tool_V2.06 zip file

Figure 12. NuMicro_ISP_Programming_Tool_V2.06 folder

Figure 13. “(1) Application Program” folder

Figure 14. “Executable File” folder

Figure 15. NuvoISP.exe file

Figure 16. NuMicro ISP Programming Tool 2.06 software on the first opening
4. Getting Started to New Project Building
After you have installed all of the needed software on part-3 and connect your DT-ARM NUC120 board to computer with follow the figure 2 above, now it’s time to get started build your first project.
STEP 1: Open CooCox CoSmart
For the first step, open CooCox CoSmart software from windows start menu or its shortcut on your computer desktop. The opened Coocox CoSmart software displayed on figure 17 below.

Figure 17. Coocox CoSmart has been opened
STEP 2: Select Chip on CooCox CoSmart
Before you create a new project on CooCox CoIDE, you have to select a chip series, in order you can select a chip that you will use. To select a chip that you will use to build your project, with the CooCox CoSmart software, just click “New Chip” button that available on “Chip” section (See figure 17). Because on this first project, we use microcontroller chip NUC120RD2BN series from Nuvoton that has been embedded on DT-ARM NUC120 board, so on the “Select New Chip” window, for the “Manufacturers,” click “Nuvoton.” See figure 18.

Figure 18. Select New Chip window - Manufacturers
After that, Nuvoton microcontroller families series list will open as shown on figure 19 below.

Figure 19. Select New Chip window - Chips series
After you select one of Nuvoton microcontroller chip series (NUC120RD2BN), on the “Chips” tab of the CooCox CoSmart will display the pin configuration. See figure 20.

Figure 20. NUC120RD2BN microcontroller pin configurations
STEP 3: Configure GPIO on CooCox CoSmart
To start configure the Nuvoton microcontroller GPIO, just check the feature that you want to configure. For this project, we need to configure GPIOA feature. So check GPIOA. See figure 21.
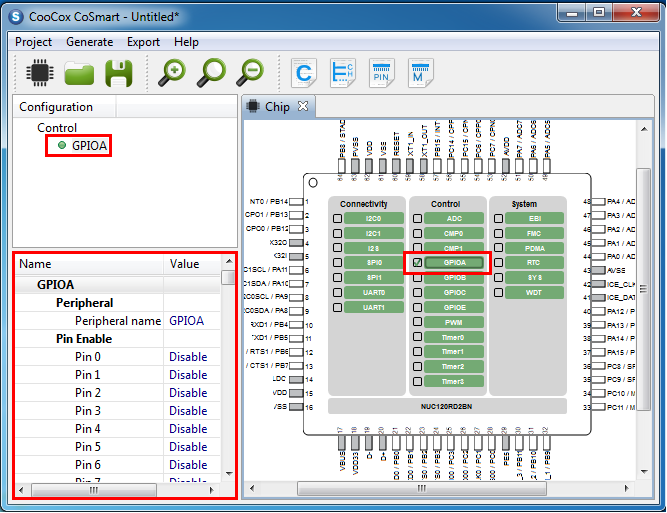
Figure 21. Check GPIOA to configure it
On this project we will use pin 0 and pin 7 of GPIOA to control Light Emitting Diode (LED) that installed on that pins. See figure 2, so we need to “Enable” that microcontroller pins. To enable a pin using CooCox CoSmart, just click “Disable” status on the configuration section of CooCox CoSmart. If you click the “Disable” on a pin, the pin condition will be change become “Enable.” It is give information that the related pin has been activated, but otherwise, If you click the “Enable” on a pin, the pin condition will be change become “Disable.” It is give information that the related pin has been deactivated. See figure 22.

Figure 22. Enable Pin 0 and Pin 7 of GPIOA
After the pins configuration steps has been completed, save that configuration with select the “Project” menu on the CooCox CoSmart and choose the “Save” option. See figure 23.

Figure 23. Save the pins configuration
STEP 4: Generate CooCox CoIDE New Project From CooCox CoSmart
From CooCox CoSmart we can generate CooCox CoIDE new project. Select the “Generate” menu on the CooCox CoSmart and choose the “generate CoIDE Project” option. See figure 24.

Figure 24. Generate CooCox CoIDE new project from CooCox CoSmart
On the New Project windows, determine the Project Name, un-check “Use default path”, and determine a directory as the Project Path. After that, click “Next” button, See figure 25!

Figure 25. CoIDE New project - project name and the path

Figure 26. A CooCox CoIDE new project folder generated automatically
For your information, on the CooCox CoIDE new project folder, there are two C-program file, i.e. “Init.c” and “Main.c.” The two C-program are generated by CooCox CoSmart software. “Init.c” contain with peripheral initialization functions which we have configured it on Pin configuration step (STEP 3) above on CooCox CoSmart software. Below is the detail program of “Init.c” program file.
Init.c
STEP 5: Create Program on CooCox CoIDE Program Editor
Before create program to control LED behaviour on Pin 0 and Pin 7 of NUC120RD2BN series microcontroller, please open the CoIDE project file (*.coproj) from the new project folder that has been generated using CoSmart on step 4 above. Double-click the project file (See figure 26), wait for a moment until CoIDE new project opened (See figure 27). To open the CooCox CoIDE program editor, double-click the main program (main.c). Type your program on the program editor (See figure 28).

Figure 27. CoIDE new project has been opened

Figure 28. Open main program (main.c) & CoIDE program editor
On this first project, we will create a program to control two LED (Ligth Emitting Diode) which installed on Pin 0 and Pin 7 of the Nuvoton NUC120RD2BN microcontroller GPIOA. Write the program below on the Coocox CoIDE program editor, see figure 29!

Figure 29. Write the program on Coocox CoIDE program editor
This program will make LED components which installed on Pin 0 and Pin 7 of GPIOA light-up alternately. Below is the full program:
main.c
Step 6: Build The Program
In order the program can be downloaded (sent) to the target microcontroller chip, so the program must be compiled (built) first before downloaded. To do so, click the build button or we can use shortcut-key F7. See figure 30.

Figure 30. Build the created program
If the build process run successfully, on the Coocox CoIDE console section will generate notification that “ BUILD SUCCESSFUL” as we can see on the figure 30.
Step 7: Program Download to The Target Microcontroller Chip
To download (send) the built program to the target microcontroller chip, lets follow the steps belo:
#1: Open NuMicro ISP Programming Tool Software (NuvoISP)
Double-click the NuvoISP launcher on its storage directory (in your computer) or on your computer desktop (if you have make it) to open it. See figure 31.

Figure 31. launcher (exe) file to open NuvoISP

Figure 32. NuMicro ISP Programming Tool software (NuvoISP) - Disconnected
After the NuvoISP opened, the connection status is still “Disconnected”, so make the NuvoISP software connect to the Nuvoton microcontroller on the development board which you use. To do so, select “USB” option for the connection interface and then click “Connect” button so the connection status change to “Connected.” See figure 33.

Figure 33. NuMicro ISP Programming Tool software (NuvoISP) - Connected
#2: Browse The Bin File of Your Build Program
Browse the bin file of your build program by click “APROM” button on the “Load File” section of NuvoISP software (See figure 33). Find the bin file on its storage directory and click “Open (See figure 34).

Figure 34. The bin file of your build program on its storage directory
After “APROM” button has clicked, the bin file will loaded and its data displayed on the “File Data” section of NuvoISP software. Before get started to download the bin file data, don’t forget to select 32 bits radio-button and check “APROM” on the “Programming section (see figure 35). If thats all has done, then click “Start” button to get started to download the bin file data into the Nuvoton microcontroller target on your development board which you use.

Figure 35. NuvoISP software - Bin file has been loaded
After that, the download process will run. Wait for a moment. If the download process run successful, on the NuvoISP will opened a window that inform if the programming flash Ok (See figure 36).

Figure 36. NuvoISP software - Program download process run successfully
To ensure that the built program has downloaded into the target Nuvoton microcontroller chip, please observe the project hardware. Is the LED behaviour has been as your expectation? If yes, that is sign that the built program has downloaded well.
0 comments:
Post a Comment