

robotics-university.com | Hello my friends, today I will post my learning result to get started create a new project on LabVIEW. For this first time learning, I will create a GUI to control the condition of five square LED with five slide switch on the LabVIEW Front Panel and create its graphical program on the LabVIEW Block Diagram.
Wanna know the result? Let’s follow its steps on this article!
A. Create New Project
To start create a new project, click windows start button then select NI LabVIEW icon. See figure 1!

Figure 1. Click start >> NI LabVIEW program
After we do the steps above, a LabVIEW window will opened. See figure 2! On LabVIEW window, there are two button option that we have to select. Click “Create Project”button if We want to create a new project or click “Open Existing” button if We want to open an existing LabVIEW project on the computer. See figure 2!

Figure 2. LabVIEW opening window
Because this article guide to create a new LabVIEW project, so click “Create Project” button!

Figure 3. Create project window - select project starting point
After “Create Project” button clicked, a “Create Project” window will opened. See figure 3! On “Create Project” window we must select one starting point for our project. Select “Blank Project” cause we want to create new project, then click “Finish” button!

Figure 4. LabVIEW Project explorer
“Project Explorer” window (see figure 4) will opened after “Finish” button clicked. There looked has no project created.
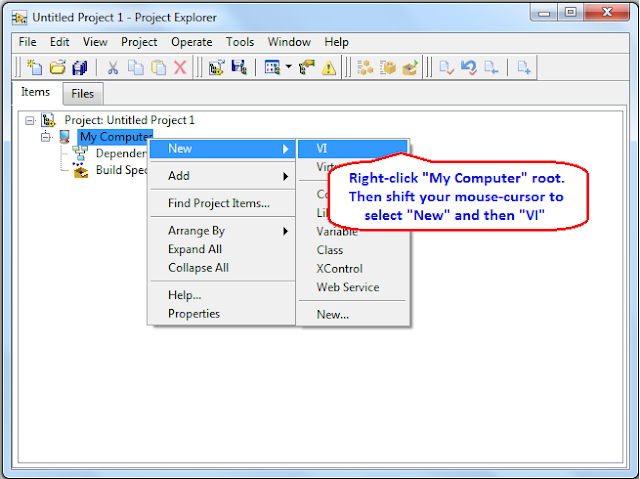
Figure 5. Open new Virtual Instruments (VI)
To start create a new LabVIEW project, on “Project Explorer” window, single-right-click on “My Computer” root/directory. Then select “New,” shift mouse cursor to right, and click “VI” option. See figure 5!

Figure 6. Front Panel and Block Diagram window
After “VI” option clicked, “Front Panel” and “Block Diagram” window will opened (See figure 6). Front Panel window is a LabVIEW window that use to create GUI for user systems, while Diagram Block is a LabVIEW window that use to build LabVIEW graphical program to control the behavior of GUI that create on the Front Panel .

Figure 7. Select “Tile Left and Right”

Figure 8. Front panel & Block diagram ready to use
To arrange the Front Panel and Diagram Block window position become side by side as shown on figure 8, select “Tile Left and Right” option on Window menu-bar of Front Panel window. See figure 7!
B. Create Graphical User Interface (GUI) on LabVIEW
1. On the Front Panel - Open Controls Palette
To open “Control Palette,” click View menu on the Front Panel menu-bar, then select ‘Control Palette” option. See figure 9!

Figure 9. On the Front Panel - Open “Controls Palette”
2. On the Front Panel - Starting Build a Graphic User Interface (GUI)
A) Add GUI Objects that We Need
On LabVIEW controls, there is available some objects category (Modern, Silver, Systems, Classic, Express, etc.). For example, we will make a LabVIEW program to control the ON/OFF condition of a Round LED using a slide-switch. So we need to add one Slide Switch and one Round LED object on the Front Panel area. On this example, we use objects on the “Modern” object category. See figure 10!

Figure 10. Select Boolean sub-object category from MODERN object category
To start placed an object on the Front Panel area, Click “Boolean” sub-object category then select “Slide Switch” object in it. See figure 11!

Figure 11. Placed “Slide Switch” object on Front Panel area
Still on “Boolean” sub-object category, select “Square LED” object in it. See figure 12!

Figure 12. Placed “Square LED” object on Front Panel area
With the same step, we can add more (Slide Switch and Square LED) objects on the Front Panel. It is dependent on the needs of our system.
B) Change the Object Name and Size
To rename an object name, just double-left-click on an object name and you can type the new object name. On the Front Panel, you also resize of the objects. You just place you mouse cursor on the top of an object, then left-click and hold an object handler, and drag the object handler to your expected direction (to left, to right, to up, to down, etc.). See figure 13!

Figure 13. The GUI of LED behavior controller (ON/OFF)
Figure 13 showed the GUI design that we have built.
C. Create Graphical Program on LabVIEW
To start create a graphical program, we just make a connection from input object (Switch) to output object (LED). See figure 14!

Figure 14. LabVIEW graphical program to control the GUI behavior
Figure 14 showed the LabVIEW graphical program that we have created.
D. Save the New Project
Before we run our GUI on this project, it is better if we save this project to a storage directory on our computer. To save, Click “File” on Project Explorer menu-bar, then select “Save All (this project).” This step will make our project file (the GUI on Front Panel and the graphical program on Block Diagram) saved on the selected storage directory in our computer. See figure 15!

Figure 15. Save LabVIEW project file (*.lvproj and *.vi) - File >> Save All (this Project)
After you click “Save All (this Project) option and we select a storage directory to save our LabVIEW project, a “Name the Project” window will open. See figure 16! On that window, please determine the project file name and left the file type on the “Save as type” field as the default (*.lvproj). If we have finished to determine the project file name and make sure the project file type/extension, then click OK button, to save it.

Figure 16. Directory to save project file (*.lvproj)
After we save the project file (*.lvproj), a “Name the VI” window will open. See figure 17! On that window, please determine the virtual instrument (VI) file name and left the file type on the “Save as type” field as the default (*.vi). If we have finished to determine the VI file name and make sure the project file type/extension, then click OK button, to save it.

Figure 17. Directory to save VI file (*.vi)
Note for Project Name:
There is two file that we must save, i.e. project file with “.lvproj” extension and virtual instrument (VI) file with “.vi” extension. To make us easy to recognize the project file, it is better if we give the project file name and virtual instrument file name using a same name. In this project I give the both files name with “GUI for LED ON-OFF control” See figure 16 and figure 17 above!

Figure 18. The project files has been saved on a selected directory
If the save project file process has done completely, the project file and VI file with name “GUI for LED ON-OFF control” will displayed on LabVIEW Project Explorer window. See figure 18!
E. Run the LabVIEW GUI
After we have been success create the GUI on LabVIEW, create the graphical program to control the GUI behavior, and save it in a computer directory, now it’s time to run the GUI. Test the project, does there errors or not.
To start to run the GUI, on Front Panel, single-left-click “Run Continuously” button. See figure 19! If there is no errors, the Front Panel area will change to running mode as displayed on figure 20.

Figure 19. Run continuously button - To run the GUI

Figure 20. The running GUI
If there is no errors, on the Front Panel, we can test the GUI to switch ON or switch OFF tha square LED object by click/shift the switch objects on that GUI. For example, if we click “switch1” object once then the “LED1” object condition will change to ON condition and vice-versa, if we click “switch1” object for the second-time, the “LED1” object condition will change to OFF condition.

Figure 21. Stop the running GUI - Using “Abort Execution” button
If we have test the GUI and after that we want to stop the testing, we can stop the running GUI by click the “Abort Execution” button on the front panel or on the block diagram. See figure 21 above!
0 comments:
Post a Comment