

robotics-university.com | This article will guiding you to build your own Virtual Controller/Robot that will you use to do a simulation. To build Virtual controller/robot, follow the steps below!
1. Build Virtual Controller (Robot)
Select setup menu, then select “PC to Controller Communications” option (See figure 1) and wait until the PC to Controller Communications window opened (See figure 2).

Figure 1. Setup >> PC to Controller Communications

Figure 2. PC to Controller Communications window
Press “Add” button until “New Controller Connection” window opened. See figure 3!

Figure 3. PC to Controller Communications window
Select a connection type, choose “Connection to new virtual controller” radio-button and the click OK button. So in the PC to Controller Communications window created a new virtual controller named “Virtual 1.” See figure 4!

Figure 4. PC to Controller Communications window with a new virtual controller
Change the virtual controller name with your wanted name, as the sign that the new virtual controller/robot was created by you. Double click the Virtual 1 column, so you can rename the virtual controller name. For example you give the new virtual controller name with “myLS6_robot.”

Figure 5. Rename the virtual controller name
If you have finished type the new name of the new virtual controller then press “Apply” button.

Figure 6. The new virtual controller with new name
After that, press the “Close” button to close the PC to Controller Communications window. See figure 6!

Figure 7. myLS6_robot virtual controller available on connection drop-down
Until this point, your new virtual controller has been created successfully. See figure 7! But your new virtual controller (myLS6_robot) has not been ready to use. To make your new virtual controller ready to use, you have to configure a robot in it.
2. Configure a Robot
To start configure a robot in your new virtual controller (myLS6_robot), you have to connect to your virtual controller first. Select myLS6_robot virtual controller on the connection drop-down. See figure 8 and figure 9 below!
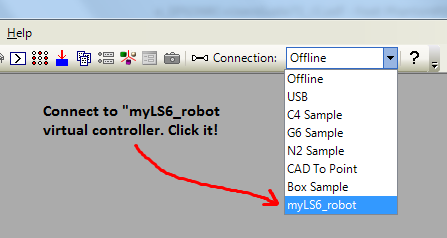
Figure 8. Connect to myLS6_robot virtual controller

Figure 9. myLS8_robot virtual controller has selected
Next step, select Setup menu and choose “System Configuration” option. See figure 10!

Figure 10. Open the system configuration window

Figure 11. System configuration window
After system configuration window opened, click Controller root (See figure 11) and then select “Robots” root (See figure 12). There are showed a statement, “There are currently no robots in the system. Click the Add button to add a robot.” The statement inform that on the new virtual controller (myLS6_robot) has not configured a type of EPSON robot. So you have to configure it with click the “Add” button to add a robot. See figure 12!

Figure 12. Select robot option and add a robot type
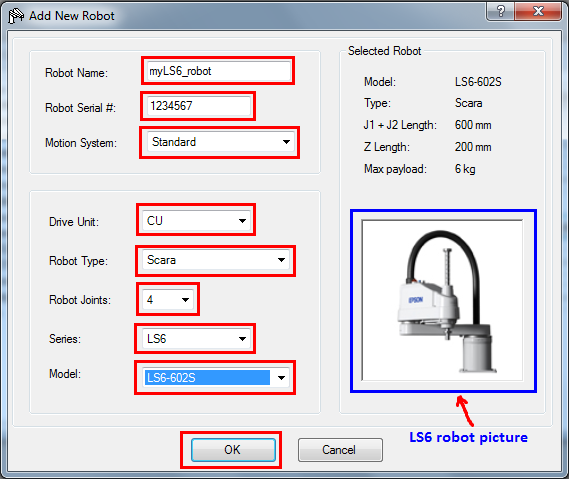
Figure 13. Add new robot window
If the “Add” button has clicked, an “Add New Robot” window will opened. See figure 13! Fill and select the robot parameters (for this case, choose LS6 series EPSON robot) that will you use properly. There are provided some robot parameter like, Robot Name, Robot Serial, Motion System, Driver Unit, Robot Type, Robot Joints, Series, and Model. After you finish with the robot parameter, then press OK button (See figure 13), so the virtual controller automatically restarted. See figure 14!

Figure 14. The virtual controller restarted (Wait and don’t close it!)

Figure 15. The robot information after the virtual controller restarted
If the robot configuration has been configured properly suit with the wanted and the needed, press “Close” button (See figure 15) to close the system configuration window and your virtual controller (LS6 robot) has been ready to use now.
To start using your new virtual controller, select Tools menu and choose Simulator option or you can use a short, i.e. Ctrl+F5 (See figure 16).

Figure 16. Step to start using new virtual controller

Figure 17. New virtual controller/robot LS6 series ready to use for simulation
Congratulation, your virtual controller for LS6 series EPSON robot has been ready to use now. See figure 17!
Source:
[1] EPSON RC+ software user guide
0 comments:
Post a Comment